Log takes
You can log every take on the Log tab of On Set as it happens: its slate, camera, roll and clip, lens and exposure, timecode, and notes. FilmKit fills in most of a new take from the last one, so a take often needs only a tap.
To log takes, the scene must have at least one planned shot. If the log says shots appear once they've been planned, click Shot list and plan the coverage first. See Plan shots.
Read the log
Each take is a row with these columns:
- Slate: The scene, shot, and take number.
- Cam: The camera, in its register color.
- Roll · Clip: The camera roll and clip number.
- Timecode: The timecode in and out, or a running duration while the take rolls.
- Lens · Stop · ISO: The lens or focal length, the stop, and the ISO.
- Marks: Notes, tags, timecoded notes, reference stills, and the star rating.
Between the takes, a line marks each card change (for example, A013 closed and A014 open), and camera events such as a rejam appear where they happened. A small flag on a cell means the wrap check found something missing there. See Check the day and export camera reports.
Add a take
- In a project, click On Set in the sidebar.
- Click (or press N).
The New take sheet opens on the shot you're shooting, with the slate, camera, roll, next clip number, lens, and exposure carried over from the last take. Carried-over values appear dimmed until you change them.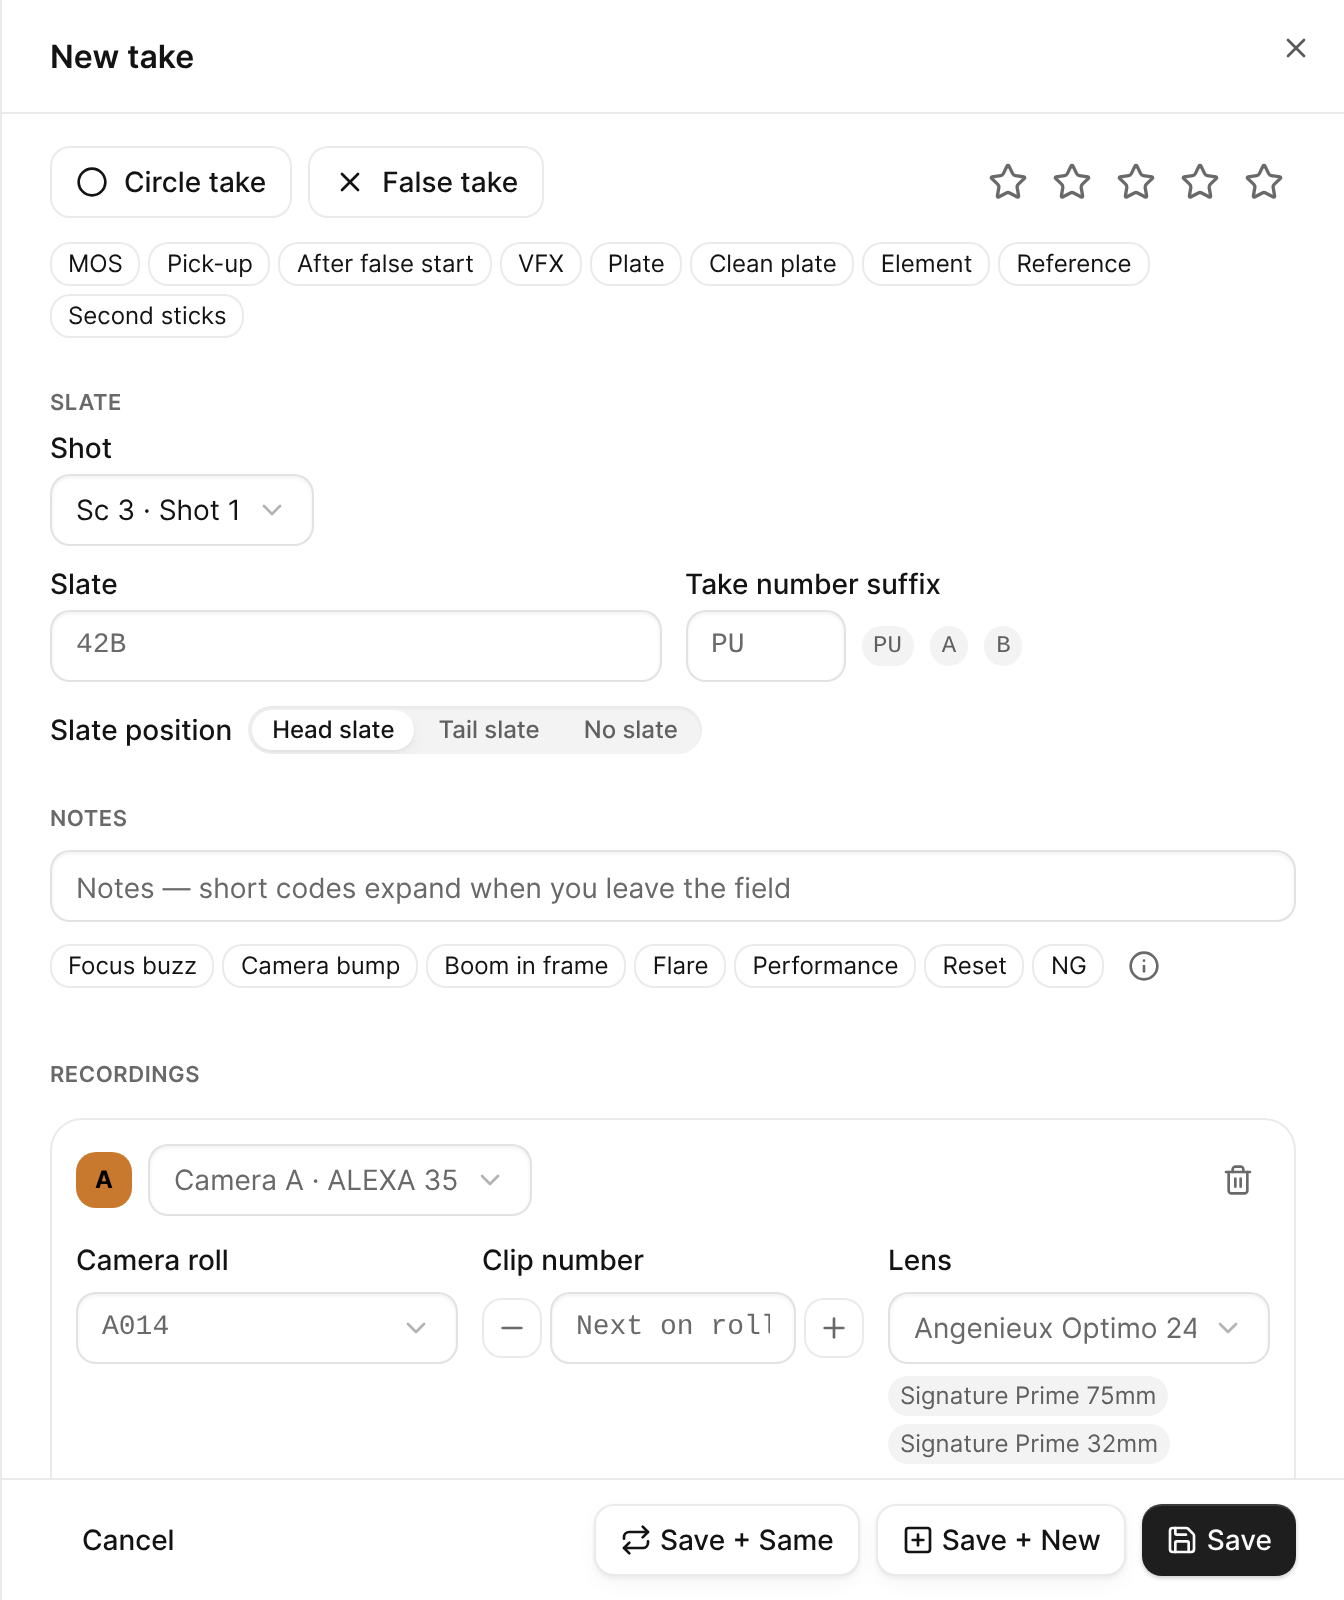
The New take sheet, prefilled with the slate, camera A, the current roll, and the last lens. - At the top of the sheet, click Circle take or False take if you already know, and click any flags that apply, such as MOS or Pick-up.
- Check the Shot, then change anything that's different on this take.
- Click Save.

The sheet shows the settings you change most often. Do any of the following to reach the rest:
- Change a camera's shutter, white balance, ND, filters, LUT, or position: On the camera's card, click More settings. While it's closed, the row lists the values already set.
- Change the timecode, details, custom tags, keywords, or linked takes: Click Timecode, Details, or Tags & links near the bottom of the sheet. Each closed section lists the values it holds. A section with an error opens by itself when you save.
- Log a ramp (for example, a focus pull or a zoom): Click next to Focal length, Stop, or Focus distance, then enter the end value.
To log the next take with the same setup without opening the sheet, click Same again (or press S). In the sheet, Save + Same saves and starts the next take on the same shot, and Save + New starts the first take of the next shot with this setup.
Roll, cut, and mark the moment
- On the take's row, click , then choose Start rolling (or press R).
A Rolling strip appears above the log with a running duration and the timecode in. - When the take ends, click Cut in the strip (or press Space).
To mark a moment, click (or press M). While a take rolls, the mark becomes a timecoded note on that take; between takes, it's logged as a camera event. Mark needs to know which camera this device logs: click , then under Cameras, click the device button next to the camera.
You can also roll and cut from the digital slate. See Use the digital slate.
Circle, rate, and flag takes
Do any of the following:
- Circle a take: Click the circle at the start of the row (or press C). Click it again to uncircle.
- Rate a take: Click a star in the Marks column (or press 1 to 5; press 0 to clear).
- Mark a false take: Click , then choose Mark as false take (or press F). The row shows an X instead of the circle.
- Tag a take: Click , then choose a tag such as Pick-up, After false start, VFX, or Second sticks.

Add notes and reference stills
- Click a take's row to open it (or press E). To open a shorter Quick edit sheet, right-click the row.
- Enter notes in the Notes field, or click a quick note to add its phrase. Typing a quick note's short code expands it when you leave the field.
- Under Timecoded notes, enter a timecode and a note, then click Add note.
- Under Reference stills, click Add still, or drag an image onto the section. You can add a caption and drag stills to reorder them.
- Click Save.

In the take sheet, you can also link a take to another (for example, as a pick-up or a clean plate) under Tags & links, and copy lens, exposure, or position from another take with Match continuity above the camera cards.
Log a camera event or a roll change
- Click .
- Under Cameras, do one of the following next to the camera:
- Start a new roll: Click the roll button. The current roll closes, and clip numbers restart on the new roll.
- Log a camera event: Click the event button, choose an Event such as Rejam, Card error, or Body swap, click Now to stamp the timecode, then click Log camera event.
Find, group, and save views
Do any of the following:
- Show one shooting day: Choose a day from the menu at the left of the toolbar, or choose All days. The log opens on today's shooting day when there is one.
- Show one camera: Click the camera's letter next to the day menu.
- Search: Enter text in the search field (or press /). Operators narrow the search, such as
cam:A,roll:A014,rating:4+,tag:VFX, orcircled. - Group and sort: Click , then choose Shooting order or Camera & roll, and a sort order.
- Save a view: In the View menu, enter a name, then click Save view. A saved view keeps the search, filters, grouping, and sort; click its name to apply it.

Change several takes at once
- Click , then click Select takes.
- Select the takes you want to change, or click Select all.
- Use the batch actions bar: Set field (lens, stop, ISO, frame rate, and more), Tags, Circle, Uncircle, Mark false, Re-card to move takes to another roll, or Delete.
- Click Done selecting.

Delete and restore takes
- Click , then choose Delete take.
- Click Delete.
The take moves to the project's Trash, with its notes, circle mark, and keywords. To restore it, click Trash in the sidebar, then click Restore next to the take. See Restore deleted items from the Trash.